Monday, September 19, 2011

2. Flashing a Custom Recovery into Nexus S

A typical Android device contains a few partition, the most important being
  1. boot
  2. recovery
  3. system
  4. cache
  5. userdata
The recovery partition can be flashed with a .img file. The basic recovery that comes with stock android has nothing more than the android mascot image with an exclamation symbol!

Replacing this with powerful recoveries like Amun-Ra or Clockwork Mod(CWM) gives you opportunities beyond imagination to play with your device!

The procedure mentioned below uses CWM. You can obtain it for free from the official site. Just get the latest version for 'crespa' the code name of Nexus S.

Flashing custom recovery from within Android requires the phone to be rooted and it's no more different and installing an app from the Android market itself. You could search and download it off Google Android market and follow the simple UI provided.

Although since now, we consider the phone out-of-the-box unrooted, it requires the phone to be in fastboot mode as mentioned in the previous post. (Unlocking the bootloader)

Once in fastboot mode, run the following command on your desktop's terminal.
 
fastboot flash recovery path_to_recovery

That should do the magic. Once done, you can scroll down to the 'recovery mode' in the bootloader menu using the volume button and selecting it with the power button.

Voila! There's you CWM recovery.
 
btw fastboot reboot on your terminal will also remote reboot your phone just like the 
reboot on your bootloader menu.


Just a word of caution: This recovery isn't going to remain here forever. After a complete reboot, this recovery will be lost due to an android-script that runs at boot time, which will replace the stock recovery. A couple of system files will have to be deleted to prevent that. That can be achieved after rooting the device.






Tuesday, September 13, 2011

Google Bookmarks in chrome

If you are like me, using a hell lotta bookmarks and use the ALL POWERFUL Google bookmarks (the same one Google toolbar uses in firefox, ie etc), then you probably hate Google's move to Google docs for chrome's bookmark sync. Sync could be good, but I can't lose my old ones at Google bookmarks.

Now, you want to use the super-chrome's super features :) and toolbar of firefox which sadly is not available with chrome. Here's the solution to all!


To Google bookmark a page in Chrome

To bookmark the current page, I click myBookmarks button. (You can see in the screenshot that I file it under Send to, but you can put it anywhere.) I optionally edit the title and add tags to make it easy to find later, and click Add bookmark.
At this point, my Google bookmark is saved and I can access it later from anywhere.

To return to a Google bookmarked page in Chrome

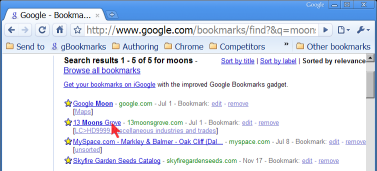
To find a Google bookmark page, I use search, naturally. In the address bar (a.k.a. the omnibox), I type gb (for Google Bookmark), press Tab orSpace, type search word(s) that match the bookmark name or tags, and pressEnter. On the results page, I click the bookmark I wanted.

To add these customizations to Google Chrome

To create the Bookmarks button, drag this bookmarklet to the Google Chrome bookmarks bar: Google Bookmark (or do the same thing from Google’s help page Bookmarks: Using Google Bookmarks, which is where I got it).
You can, of course, add the bookmarklet to a folder, as I did.
To add Google Bookmark search to the Chrome address bar, right-click in the address bar, choose Edit search engines…, click Add, fill out the form as follows, and click OK:
Name:
Google Bookmarks
Keyword:
gb
URL:
http://google.com/bookmarks/find?&q=%s
(In the Search Engines window there is also an option to make this the default search, if you wish.)

Rooting the Nexus!

Rooting:

Rooting is a process that allows users of mobile phones and other devices running the Android operating system to attain privileged control (known as "root access") within Android's Linux subsystem with the goal of overcoming limitations that carriers and manufacturers put on some devices. It is analogous to jailbreaking on devices running the Apple iOS operating system.

That's how Wikipedia defines it! In short, you become the admin user a.k.a God! :) and mess up things the way you love!

I understand that the word Jailbreak sounds more like an illegal activity than 'Rooting' does. And actually their intentions are similar to their phonetics and so are the companies' views on them! Apple wants to prevent Jailbreaking on their devices while Google support rooting theirs! :)

Google is in fact urging it's partners, the hardware manufacturers to impose less restriction on the hardware/software and encouraging them to let the users decide how they want their phones. Although Android is now running more than just phones. For instance Android now runs Barnes & Nobles' e-Reader 'Nook', Sony's new Z-series Music Player, just to mention a few.

On that front, HTC has now officially released instructions along with the required tools, on their websites, to help customers unlock their phones.

The Nexus S comes with an awesome bootloader from Google that makes unlocking and rooting the devices the easiest! Easier than on any other phone.

Rooting the phone requires installation of a super user application on the device. Now the super user tool comes in two pieces - the binary which does the rooting and then the app that lives in the App drawer of the phones that gives and GUI to manage grant and revocation of SU rights to any other app as and when required.

The following is the breakup of the steps and each step is explained in detail in separate posts. This is to enable you to understand what you're upto and hence not again read the lines "Don't do this if you don't know what you're doing"!!!
  1. Unlock the bootloader
  2. Install custom Recovery
  3. Install the super user binary (& app).

1. Unlocking the Bootloader

The bootloader of the Nexus S is locked initially. You'll have to unlock it using a tool called fastboot. Warning: Since unlocking the bootloader and rooting the phones gives access to all the private data, by circumventing the Android's security model based on Unix, all your phone's data and data on the internal SD card will be erased for security reasons. Hence take a backup of the important data into your computer before you proceed.


You should have Android SDK installed in your machine. For this tutorial, I use a mac. Post Android SDK installation, download and place fastboot (which is just a single binary file) in your path or if you're comfortable, run it from any directory, using a terminal.

I would prefer you to place fastboot in the 'tools' directory of your android SDK installation.

Step 1. Reboot your phone into the bootloader by shutting it down and then turning it on by holding the volume up button + power button and you should see this.

Step 2. When on the bootloader screen, connect your phone to PC/Mac and run the command

fastboot devices
which should give an output similar to

List of devices attached 
HTXXXXXXXXXX	device


Step 3. Once, it's confirmed that your device is recognizable by fastboot, run the following command to unlock the bootloader. 

fastboot oem unlock
 
Read the warning on the phone and accept it.  That's it! Now you have an unlocked phone or bootloader, perhaps! :D This can be confirmed by seeing noting the last line on the first paragraph of the bootloader screen that reads

LOCK STATE - UNLOCKED

Next you shall run  

fastboot reboot
reboot your phone. Another hint to know that your bootloader is unlocked is to reboot your phone into the os and you can notice that beneath the Google logo appearing while it boots, there should appear an unlocked-lock icon!

It should be no surprise that you can run

fastboot oem lock
to lock the bootloader if you wish!

Wednesday, May 18, 2011

Keep Apple trailers with you!

If you're like me and love watching trailers over and over especially in HD, it's frustrating to watch them online at Apple trailers.  You would want to use a Download manager but what better than wget?!

And it's not that easy when you are a mouse-hater! Yes I know how frustrating it is to reach for the mouse/trackpad when you love the keyboard! So here's a shell script I made to ease it! (You'll need to have wget installed though)

It's not 100% perfect. I've still got more options to add and make it better. But for now...

(I'll be adding explanation soon...)
Credits for whoever wrote that Regex for the url!

An eg:  Enjoy an awesome Harry potter trailer here!
atget http://trailers.apple.com/movies/wb/harrypotterandthedeathlyhallowspart2/harrypotterhallows2-tlr1_720p.mov


#!/bin/bash
# atget - download trailers from Apple trailers


# Usage if no parameters given
if [ $# -eq 0 ]; then
  echo "     Download Trailers from Apple iTunes website"
  echo "     usage: atget [-c] "
  echo "     where "
  echo "            -c    Resume incomplete download" 
  exit
fi


#Should resume download with wget?
wgetc=


if [ "$1" = "-c" ]; then
  oldurl=$2 
  wgetc="-c"
else
  oldurl=$1


  filename=$(basename $oldurl)
  save_location=$HOME/Movies/$filename
  if [ -f $save_location ]; then
  echo -n "File exists with same name already! Overwrite (o) / Resume (r)? "
  read result
wgetc="-c"
  if [ "$result" = "o" ] || [ "$result" = "O" ]; then
wgetc=
fi
# exit
  fi
fi


# Prepend 'h' before resolution to create a valid url
newurl=$(echo $oldurl | sed 's/_\([0-9]*[0-9][0-9][0-9]\)p.mov/_h\1p.mov/g')


filename=$(basename $oldurl)
save_location=$HOME/Movies/$filename


# Download trailer and save to Movies folder of the user
wget $wgetc -U QuickTime "$newurl" -O $save_location


Thursday, January 27, 2011

Android Hello, NotePad tutorial

If you have been following the notepad tutorial at Android's developer page here, everything would go fine until you reach Part 2. It spits out quite a lot of errors, when you import the example code given for the second section. There is no solution in one place for the errors you encounter. Worse, the solutions found around the web, put together also doesn't work at times. So following is what has been missing - A one stop solution!


Warning: This's not for you, if you're completely new to Android. You must be ready for the Notepad tutorial with quite the basic knowledge of resources, build targets etc.

Problem 1: String types
To start with, the part 2 of the Notepad tutorial (hence referred as N2), is built against API level 8 (Froyo).
If you are adamant to only work with the API version your phone is running (mine being 7 - Eclair) and not even install the higher versions, then BANG, that's the cause of 

Error: String types not allowed (at layout_height with value 'match_parent')
Error: String types not allowed (at layout_width with value 'match_parent')

Solution 1:
Install a new build target 'API level 8' using the Android AVD and SDK manager, change the build target  property of the project. 

or You only want to stick with Eclair, change the layout properties (in note_edit.xml) from match_parent to fill_parent. Match_parent is a new attribute added in API 8.

Problem 2: R resolution

The resource file R that has to be generated by Android SDK for you, is not being generated.

Solution 2:
A) Manually clean the project in Eclipse (Project > Clean)
and re-build the project. If 'Build Project is disabled, Force build the project, by unchecking 'Build Automatically'.

If that doesn't work,
B) Delete the 'gen' folder and create new 'source folder' named 'gen' in the project. Re-build project.

Problem 3: 

"The project cannot be built until the build path errors are resolved"

Occasionally this error might also crop up. In that case, modify the build path of the project. I understand, that's confusing! Although you don't need an external library, just add any third party jar file in the build path and save the settings and later remove it.

This's to force eclipse to refresh it's Build-path settings.

Happy Programming!!!


Saturday, July 24, 2010

Take a bite off the elixir

I always get this question: Why a mac? Why pay so much for that piece of gadget (or contraption as most feel it is)?

Now I think it's high time I etched down the answer to that.

Firstly, I admit, it's almost impossible to convey certain emotions. (No kidding) You need to experience it to really understand that. Similar is my state with a mac. So, I'll try my best at it.

Before I even start, shall we clear the fog surrounding some 'Apple' 'terms'?

Mac: The hardware and software both are called Mac. There are a myriad of hardware designed and manufactured by Apple. Let me just list the computers.

      iMac: A desktop computer with your CPU tower built into the monitor itself. 
      Mac Mini: A BYODKM computer. Display, Keyboard,  Mouse separate.
      MacBook: A notebook (laptop)
      MacBook Pro: Notebook with extra cost ;-), extra cosmetic value, extra power
      (nowadays macbooks are equally powerful)
      Mac Pro: A BYODKM computer again but a very high end machine, with a form factor like the
      usual CPU towers we get and very costly too.


OS X: Jargon for mac OS version 10 which is the latest series of the OS
  1. Version 10.0: Cheetah
  2. Version 10.1: Puma
  3. Version 10.2: Jaguar
  4. Version 10.3: Panther
  5. Version 10.4: Tiger
  6. Version 10.5: Leopard
  7. Version 10.6: Snow Leopard ( The lastest as of Jul 24, 2010 )
PC: Apple Inc. has chosen to call the computers running windows as PCs and their products as Mac. But in common terms, you can always call any computer you use at home or office (if you alone use it) a Personal Computer :-). Blame Apple for that!

With that done, let me start with myth-breaking...

A mac is difficult to use. It's for the geeks.
      Never. It can be used by anyone. Anyone who thinks can use a PC can use a mac. But yes, designers and developers use more of mac. That's because Mac is a blend of power and elegance. Power for geeks and elegance for noobs.

There isn't lotta software that is compatible with mac
      That was true when Apple stuck to its in-house PPC processors. Now that they are using Intel's Processors, times have changed. Almost any software you run on a PC (grrr. See that's how Apple's vocabulary infects you. Results from prolonged Mac usage) err..., Windows machine has a Mac counterpart. Most times, a better alternative is available on a mac.

A Mac can't run Windows
     Similar the previous myth. Now you can either run it natively like on a PC ( Forgive me. Honestly, it's difficult to adapt to this new vocab. Hence, PC = Windows machine in this post). or on a Virtual Machine like VMWare. Dual boot is very simple too. You can have both OS with no restriction. Apple gives you all required drivers too. Although I'll bet, you wont use windows once you use a Mac. 

A mac is costly
      That's INITIALLY true. It IS costly compared to other hardware that's available in the market. But believe me, it's WORTH IT. For the performance, the productivity, the life style, the peace of mind you get, YOU CAN PAY IT, actually more too. That's the thing that helps Apple have the nerve to price it so high. People fall in love with the mac. It's not everyday you buy a computer, is it?

If you ask a mac user a question: One mac or 4 PCs? What do you want?
An easy to guess answer: ONE MAC!!!

Now some personal advantages from my vantage point:

1. No crashes: Yeah. No crashes. It just works!!! Of course nothing is perfect. Software on macs crash too. But not even once in a blue moon. Even more rarely. 'Crash' is off your dictionary => No every- month-format-and-OS-reinstall.

2. No Viruses: Since, Mac OS under the hood runs over a flavor of Unix, (For more info, read abt Darwin) windows viruses are petrified in it.

3. Stable everything: Since the hardware and software are from Apple, it's the perfect marriage. So no incompatibilities. Almost all external hardware available in the market - printers, etc work well too.

4. Developer's haven: For software people like me, it's like having a Linux installation inside my everyday OS. I don't need a separate installation of Linux. You have the BASH and everything a developer needs already in here. Apache server, PHP, SNMP daemon etc. are already in there. For other tools, you can CONFIGURE, MAKE AND MAKE INSTALL from sources! Now you know why almost almost all conference videos have glowing Mac logos on the podium. Google geeks love Macs too.

Buying a mac was one of the best choices of my life. Actually, I wouldn't hesitate to say, if you are intelligent, YOU WOULD BUY A MAC.

யாம் பெற்ற இன்பம் பெருக இவ்வையகம்!
No. No kidding. I don't hesitate to pester my friends into buying one because which good friend wouldn't want his mates to enjoy the same life he does - trouble free. It's not an exaggeration when I say, "A mac changes your LIFE STYLE!"

That is why, I call a mac, An Elixir! An elixir to all the viral infections you might expect. A real macintosh for the crap rain you are in!

 Many people around me mistake me for an Apple evangelist. Unfortunately, I don't go behind brands. Never. I just go behind the best that every brand has to offer! :)